

How To Clean Up Background Noise In Found Fore Audios Studio 10
Groundwork noise is i of the well-nigh annoying issues when dealing with audio. Information technology could come up from estimator fans, heater, fridge or could be inherent to your microphone, regardless, once in your recording, information technology needs to be dealt with.
So here is a list of tips on how to deal with background racket and remove it from your audio recordings. The list is made in social club in which they should be applied.
Equalizer
The commencement effect you will want to use when dealing with background racket in your DAW is blaster.
Any sound editing software has an equalizer, if yous are unsure of what software to utilise, Audacity is always a good condom choice. In my stance, it is the all-time complimentary software for sound editing and suffice for most people.
Using equalizer you will desire to remove everything that is below 60Hz if you have a deep vocalisation. If you have a higher voice then you tin remove everything below 80Hz or 100Hz.
Most women tin remove everything below 100Hz and guys should be more cautious.
The human vocalisation does not consist of frequencies beneath 60Hz, therefore, you can be sure that annihilation beneath this threshold is not your voice, but a noise.
Removing these frequencies tin subdue rumble or some of the hiss coming from your microphone without affecting vocals. For this reason, it is the kickoff remedy yous should endeavour, considering it is completely not-destructive to your audio quality.
Blaster probably won't be plenty to remove all of the background racket and then you will accept to utilize other tools, only it is a skillful start and it doesn't diminish audio quality as other tools might.
As well, you lot will hear/read tips to non utilize equalizer before compression and usually that is true when we talk about mastering your sound, just that is non the same thing here.
At this indicate, we are only dealing with groundwork noise and if you plan to use EQ for coloring your audio so you lot volition want to do that separately, later.
Yous desire to remove very depression-stop frequencies first to avoid accidentally raising them with compression or normalization. You could fifty-fifty apply the aforementioned EQ a few times to make sure they are completely removed as EQ is often limited to 12dB or 24dB cuts/boosts.
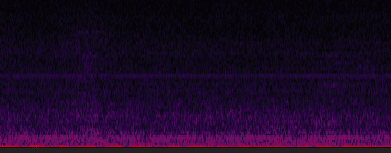
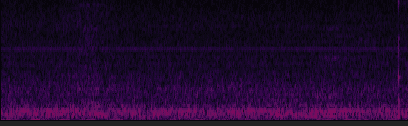
You can unremarkably remove high-end frequencies every bit well. Each voice and recording is different so try checking a spectrogram to make certain you are not affecting vocals.
In the picture to a higher place y'all can see that frequencies above 18kHz consist of noise and nosotros can remove them to further make clean upwardly the audio and reduce background noise.
Dissonance Gate
Dissonance gate is an amazing tool to remove background racket, breaths and whatever annoying noise fast.
Too, it is the second tool y'all will want to utilize when removing background noise. Similarly to EQ it volition not diminish your audio quality if washed right.
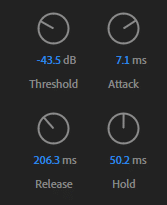
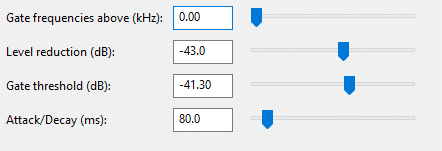
I usually employ these settings for noise gate in Adobe Audition:
However, you will find that unlike software has unlike noise gates. They might offer different parameters. For example, Audacity is much more than limited with its Nyquist racket gate and I utilise these settings for information technology:
Dissonance gate works by removing or reducing audio that is below the set threshold. When the noise gate is open up, it allows through all audio. When noise gate is airtight information technology either reduces or completely removes any audio depending on the settings.
Before applying noise gate you will demand to measure your room tone to known how high is your background noise. You lot can do that past monitoring recording levels when recording an empty room.
One time you know your room tone, you need to set up your noise gate threshold a tad flake higher to make sure y'all remove background noise.
For example, if your room tone is at around -45dB, you volition want to set upwards your threshold at -40dB to make sure your noise flooring is afflicted by a noise gate.
You tin can read in depth guide to noise gate in this article: https://voiceovertip.com/how-to-use-noise-gate-on-brazenness/
And hither is a brief summary of what each parameter does:
Threshold – sets the point from which sound is removed or reduced.
Level reduction (available in Audacity, not available in Audition) – Determines by how much audio will be reduced when below the threshold.
Assail – fourth dimension in which noise gate gradually goes from closed to open. A fade-in.
Decay/Release – time in which noise gate goes from open to airtight. A fade-out.
Hold (available in Audience, not available in Audacity) – time in which noise gate closes later reaching below the threshold, non a gradual process. Applies before release.
Generally, you lot will desire a quite low attack fourth dimension and a fleck of a concord and release/decay. Hold and release/decay volition assist to make sure that dissonance gate doesn't close abruptly and doesn't cut the ends of your sentences.
Noise gate will make cleaning up process much faster as information technology removes most of the noise in between your vocals. If done right, it will accept care of most of the breaths in your recording.
Just brand sure to insert appropriate hold or/and release parameters to avoid abrupt cuts.
Also, if possible, don't remove all of the background noise. Leaving some of the noise floor volition aid your audio to audio more natural, and noise gate closing will non exist as noticeable.
Noise gate is proficient to utilize when you have relatively low background noise. However, if you accept a lot of background noise that is credible during your vocals, then noise reduction may be a more suitable tool.
Click remover

Click remover is a helpful tool which will significantly accelerate audio editing process without affecting audio quality much.
Click remover will help with mouth clicks by removing well-nigh of them.
You can utilize it on your whole sound recording if you want a quick prepare at a minimal quality loss.
However, if sound quality is an utmost priority, or if you are dealing with a very short recording, then you might want to apply click remover only on parts of the sound where mouth clicks are audible. Information technology is a longer process, but yous will not lose sound quality at all.
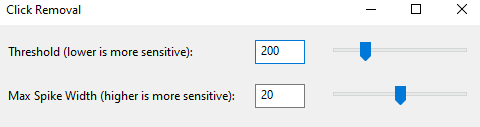
Here is a guide to parameters in click remover
Threshold – lower value will detect less audible clicks and occasionally may detect false clicks.
Max fasten width (Brazenness) / Complication (Audition) – determines the maximum width of a click. A college value volition detect more than clicks and may notice more than false clicks.
You can find more information regarding how to remove and avoid clicks in this article: https://voiceovertip.com/tips-to-remove-and-stop-rima oris-clicks-when-recording/
Racket Reduction
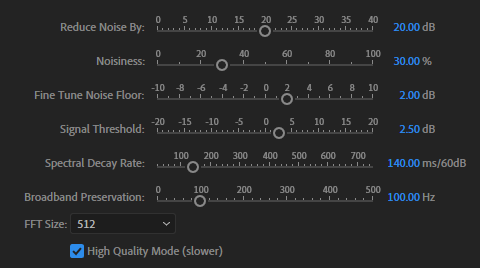
Dissonance reduction is probably the near pop tool when dealing with background noise. However, in my opinion, it is oftentimes overused.
The appeal with dissonance reduction tool is its ability to remove nearly of the noise, including background noise, mouth clicks and anything else with a few clicks and very lilliputian effort.
Notwithstanding, it all comes at a cost of reduced audio quality. For this reason, racket reduction tool is fourth in the list of tools you desire to use to remove background noise.
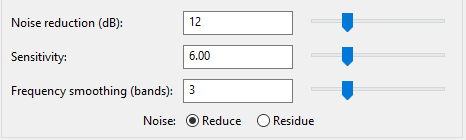
Noise reduction removes sure frequencies that noise consists of. That also means that it removes the aforementioned frequencies from your vocals. Hence, the reduced sound quality.
Adobe Audience has a decent noise reduction tool and I believe it is occasionally worth using it. With Audacity, nonetheless, you might experience a more pregnant quality reduction.
I merely choose racket reduction tool every bit a last resort when I feel that background noise is so loud that removing it with a dissonance gate would make the departure in dissonance flooring stand out when transitioning from closed to open gate. All of which is very noticeable.
Using racket reduction tool often makes your breaths sound very hollow. If left as it is they sound unnatural, however completely removing them is also a bad idea as we are used to hearing a chip of breath. So you are stuck in betwixt two bad options.
Manual clean-upwards
After yous take done using various furnishings to clean upward your audio normally you are still left with some noise.
Some of the noise is too loud for noise gate to catch and some of the rima oris clicks will be left undetected by click remover.
Just remove or benumb the remaining noise manually. You will demand to completely remove any sounds that are fabricated past you fidgeting in your chair or accidentally touching a microphone or a mic stand.
You can also benumb your breaths by 10-20dB.
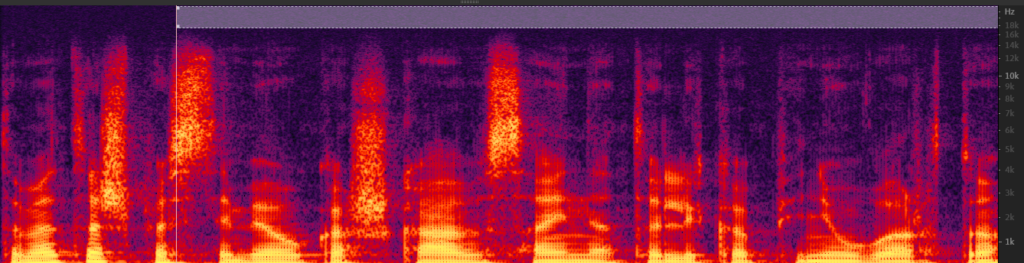
If you discover audible mouth clicks attempt to pinpoint the exact spot where it appears in the spectrogram (only like in a pic below) and attenuate it appropriately, unremarkably effectually 20dB is enough.

Conclusion
To clean up audio from background noise at starting time try using effects that don't reduce audio quality.
The sequence should be such: EQ -> Racket Gate -> Click Removal -> Noise Reduction (if possible avoid)
While information technology is very appealing to employ noise reduction tool and be washed with information technology, take some time to figure out how to use racket gate and click removal effects. One time you accept them prepare it volition take no fourth dimension to apply them and requite you better results than dissonance reduction tool.

How To Clean Up Background Noise In Found Fore Audios Studio 10,
Source: https://voiceovertip.com/how-to-remove-background-noise-from-audio/
Posted by: jonesofeautioull1984.blogspot.com
0 Response to "How To Clean Up Background Noise In Found Fore Audios Studio 10"
Post a Comment